Wondering what a furnace thermocouple does? It’s a safety feature in gas furnaces. By sensing the pilot light flame, it keeps your home safe from gas leaks. In this post, we’ll explain how it works, how to spot issues, and tips for maintenance and replacement.
Quick Facts
- Thermocouples are safety devices in gas furnaces, controlling gas flow based on the presence of the pilot light to prevent leaks.
- Regular inspection and maintenance of thermocouples, including cleaning and testing, are crucial for maintaining furnace efficiency and ensuring safety.
- Homeowners can choose to replace the thermocouple themselves to save money or hire a pro for expertise, with costs ranging from $80 to $150.
What is a Thermocouple in a Furnace
A thermocouple is a safety device in gas furnaces; it’s the gatekeeper of your furnace’s gas valve. It controls the gas valve by sensing the pilot light flame. When a flame is present, it keeps the valve open, allowing fuel to flow. When the flame goes out, the thermocouple senses the change and the valve shuts off, preventing gas leaks.
Thermocouples are used to prevent gas leaks by shutting off the supply if the pilot light goes out. This is especially important in older furnace models, where they ensure safe operation by controlling gas flow based on flame presence.
A thermocouple is made up of two different metals joined together, which generates voltage when there is a temperature difference. This clever design allows thermocouples to withstand extreme temperatures and harsh conditions, making them reliable components in your heating system.
Thermocouples are essential for the safe and efficient operation of gas furnaces. They keep your home warm and protect it from gas leaks by monitoring and controlling the pilot light.
Does Your Furnace Have a Thermocouple
Not all furnaces have thermocouples. Only gas furnaces with pilot light-based ignition systems have this component. If your furnace has a small pilot flame that’s always burning to ignite the gas burner, it has a thermocouple. Newer furnaces use electronic ignition systems and don’t need thermocouples.
Not sure if your furnace has a thermocouple? Check for a standing pilot light—this means it’s there. Thermocouples are more accessible in gas furnaces compared to hot electric furnace models, so it’s easier to find and inspect them for heat. Most thermocouples are designed for this purpose.
Common Signs of a Bad Thermocouple
Recognizing a bad thermocouple is important for furnace efficiency. Symptoms such as inconsistent heating and temperature fluctuations can disrupt home comfort, indicating that the thermocouple is not functioning correctly.
Another sign is if the pilot light keeps going out. This can prevent the furnace’s gas valve from staying open, and the furnace won’t ignite. Addressing these symptoms ASAP can prevent further issues, and your furnace will run smoothly.
Inspecting Your Furnace Thermocouple
Regular inspection of your furnace thermocouple is crucial for safe and efficient operation. Start by checking for gas leaks using a leak detector solution; if bubbles appear, it indicates that gas is escaping. Physical damage like corrosion, cracks, or discoloration should also be noted.
Suppose problems are found during an inspection, call a licensed HVAC services technician for further evaluation or replacement. This can prevent hazards and ensure the furnace runs efficiently.
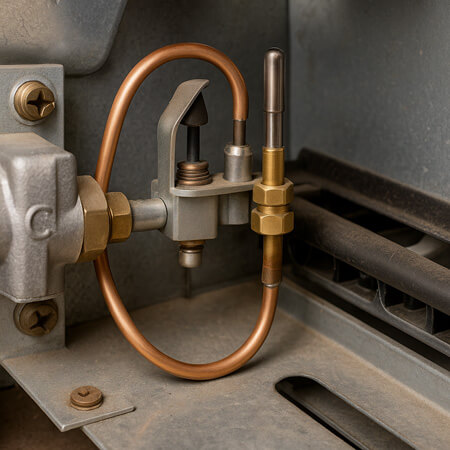
Finding the Thermocouple
The first step in troubleshooting is to find the thermocouple, usually located next to the pilot light or heating elements. It’s usually situated in the pilot light flame and connected to the gas control valve.
To access the thermocouple safely:
- Turn off the power at the circuit breaker.
- Remove the access panel.
- Look for a small square metal plate with screw heads around the border; this is your junction box panel, which may have wires attached.
Once you find it, troubleshooting becomes much easier.
Visual Inspection
Conduct a visual inspection for corrosion, cracks, or discoloration on the thermocouple. Damage can affect test results and furnace performance. Make sure it’s free from visible damage for proper function and safety.
This step can save you from bigger issues down the line.
Open Circuit Test
To do an open circuit test on a thermocouple:
- Set your multimeter to millivolts.
- Use the multimeter to measure the thermocouple.
- Determine the thermocouple’s functionality based on the reading.
Accurate measurement is key to evaluating performance.
If the reading is not within the expected range, it may mean the thermocouple needs replacement.
Replacing a bad thermocouple restores gas flow and proper furnace ignition. If your pilot light keeps going out or the furnace won’t ignite it’s time to replace.
Homeowners can replace their furnace thermocouple if they feel comfortable doing so. After replacement, relight the pilot, check for gas leaks, and make sure the furnace is running.
Replacing the Furnace Thermocouple
Before Replacement
Before inspecting and replacing the furnace thermocouple, turn off the electricity and gas supply. This is crucial to avoid electrical hazards, leaks, and fires during the replacement process.
Turning off both power and gas is the foundation of a safe thermocouple replacement.
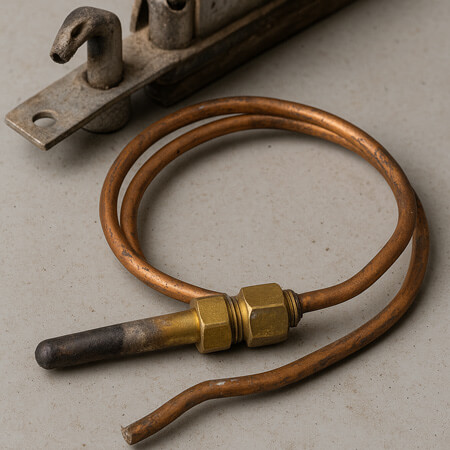
Removing the Old Thermocouple
You will need open-end wrenches to remove the old thermocouple. A screwdriver or nut driver may also be needed. Unscrew the thermocouple from the gas valve and pull it out firmly; use pliers if it’s stuck.
This step is easy but requires careful handling to avoid damaging other furnace parts. Proper removal is key to installing the new thermocouple.
Installing the New Thermocouple

Screw in the new thermocouple by hand, then tighten with a wrench to make sure it’s secure. Make sure the sensing probe of the thermocouple is in the pilot flame for accurate readings.
Test the thermocouple after reinstallation to ensure safe and correct furnace operation. Proper installation is key to functioning.
Professional vs. DIY Thermocouple Replacement
Professional replacement ensures a better repair due to the technician’s expertise; replacing the thermocouple yourself can save on labor costs.
However, DIY repairs can be risky if you lack experience and may cause more issues. The complexity of the repair determines if a professional or DIY approach is better.
Cost for Thermocouple Replacement
The cost for professional thermocouple replacement is $80 to $150, depending on location and service provider. Many HVAC companies may charge a service fee in addition to the repair cost, which can vary widely.
Older furnace models may require special thermocouples that can be more expensive and harder to find. Knowing these cost factors can help you budget for the replacement. Thermocouples need to be replaced as they are not meant to last the life of the furnace. Annual cleaning of the thermocouple is essential to prevent problems and ensure the furnace runs efficiently.
Soot and corrosion can affect performance, so regular maintenance is key. Cleaning the thermocouple keeps the ignition efficient and prevents pilot outages.
Conclusion
In summary, understanding, inspecting, and maintaining your furnace thermocouple is important for safe and efficient furnace operation. By recognizing the signs of a bad thermocouple and knowing how to replace it, you can keep your home warm and safe.
Taking proactive steps in maintaining your thermocouple will save you from potential hazards and costly repairs. Keep your furnace running smoothly and your home safe by paying attention to this small but mighty part.
FAQs
If your furnace has a standing pilot light, it likely has a thermocouple, as these are found in gas furnaces with pilot light ignition systems.
Signs of a bad thermocouple are inconsistent heating, temperature fluctuations, and pilot light outages. Address these issues ASAP to prevent further problems.
Yes, you can replace the thermocouple yourself if you feel comfortable doing so and take the necessary safety precautions. Make sure you follow the guidelines to avoid any hazards during the process.
A professional will typically charge between $80 – $150 to replace the thermocouple, depending on location and service provider. Get quotes from local technicians for the most accurate pricing.
To ensure efficient operation and prevent problems, maintain your thermocouple annually with a thorough cleaning and plan for periodic replacement as needed.